After six months of tip-toeing through the construction, we have another space ready to check off! I’m finally ready to share our Monarch Colonial Primary Bathroom Reveal. This space has been completely transformed, and I’m excited to walk you through the process and the choices we made to create a bathroom that’s both functional and a self-care haven!

When it comes to a bathroom remodel, making the most of the square footage is key. Since we were already redoing the flooring and the shower, we knew we were looking at a full gut renovation. That gave us the chance to really think about how to maximize the space and make intentional design choices that would help it work better for us in the long run.
I spent a lot of time considering how we use the bathroom daily and reflecting on what felt missing in other homes we’ve lived in. Those reflections shaped the decisions we made, and I’m happy with how everything came together.
On the blog today, I’m sharing not only the final reveal but also some of the lessons I learned along the way—practical tips for anyone planning a remodel or looking to make a few upgrades to their space.
Before Primary Bathroom Renovation:


After Primary Bathroom Renovation:

BeFORE YOU START CONSTRUCTION…
The renovation took about six months from start to finish, and two of the biggest changes I wanted to prioritize were adding more natural light and including heated tiles (controlled by a thermostat). I also made sure to add an outlet in the water closet to accommodate a bidet. Bidets need both a waterline (which toilets already have) and an electrical outlet (which most toilet rooms do not include).
These are the kinds of details that need to be decided before construction starts so you can plan properly with your contractor. Adding the window—a small oval above the vanity—was a big job, but it floods the room with natural light, making the space feel brighter and more enjoyable for my daily routine. Seriously, I LOVE natural light all the time, but especially when I’m doing my makeup!
On the other hand, running electrical for the heated floors and the water closet outlet was a relatively small project since the floors were already being demoed and replaced. I couldn’t have made these upgrades once the tile was in place, so it was important to plan for them early on in the process. These thoughtful changes have made such a difference and I’m so happy we did them!
Speaking of luxury heating items, we also have a towel warmer on the way to be installed near the tub.
About those heated MARBLE floors…
If I’m being honest…I love them! The heating functionality isn’t actually in the tiles but in the electrical and underlayment below using the products listed here.

It’s one of those things I thought would be extremely expensive, but since the floors were already being replaced, it added approx. $2,000 to our total project. That isn’t a small number, but we worked it in because it’s something we wanted this time.
If you’re already planning on replacing your bathroom floors — ask about this!

For the flooring, we chose brushed antique Hampton Carrara marble from The Tile Shop—it’s textured and non-slip, which is practical and beautiful. The tiles were 12×24, but we had them cut to 12×12 for a square look that feels clean and modern.
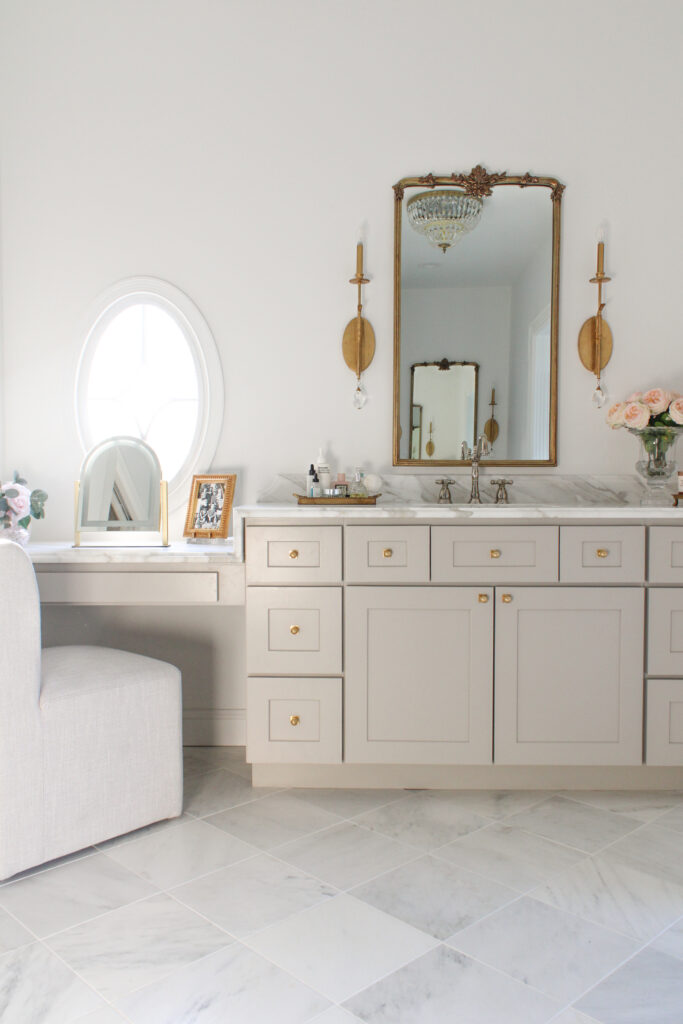
WE USED BUDGET-FRIENDLY CABINETRY (THAT WE LOVE!)
The cabinet setup was a fun challenge. Instead of going fully custom, I used RTA (Ready-To-Assemble) cabinets, which allowed us to mix and match pieces for a custom look without the hefty price tag. The cabinets are in a shade called Westin Sand Shaker, and I paired them with gold hardware from Rejuvenation—the same hardware I used in my kitchen.
What I love about RTA cabinets is the flexibility they offer. I was able to purchase each piece separately to design a layout that works perfectly for my space. For example, the cabinet beneath the sink, with its three drawers and two doors, is a single unit designed specifically for bathrooms. Next to it, I added a cabinet with three stacked drawers to fill the space and provide extra storage. This piece was installed separately, but you’d never know it—the countertop ties everything together seamlessly.
You would never know that these are all separate cabinet pieces, especially with the countertop installed. It looks custom, but on a much friendlier budget!
LOCALLY SOURCED COUNTERTOPS
The countertops are Calcutta Gold marble, sourced locally from Southern Stone. The taupe, gray, and gold veining tie the whole room together. I opted for an OG edge detail on the countertops, which gives a slightly traditional, grandmillennial feel. A four-inch backsplash made from the same marble completes the look.
The Toilet Closet
Are you team toilet closet? Personally, I really like having one, especially in a larger bathroom like this. However, instead of leaving it as-is, I took advantage of the space behind the door and added cabinetry. These cabinets are huge and have been very nice for extra storage.

We used RTA cabinets for this space, measuring and customizing them to fit perfectly—and I couldn’t be happier with how they turned out. The trim goes all the way up to the ceiling, which gives them such a polished, high-end look. It’s little details like that that really make a difference.
To make the space feel more personal, I hung a pencil drawing I picked up in Paris above the toilet. I’ve been hanging on to these for many months trying to find a deserving spot for them. It’s a small detail, but it brings so much character to the room. Finding the right art for a bathroom can be tricky—there’s a fine line between thoughtful and too much—but this piece feels just right. It’s such a nice way to add a personal touch to the space and make it feel intentional.
While these hold sentimental value for me, I think any sketch of a meaningful person or place could be very well styled in a bathroom!
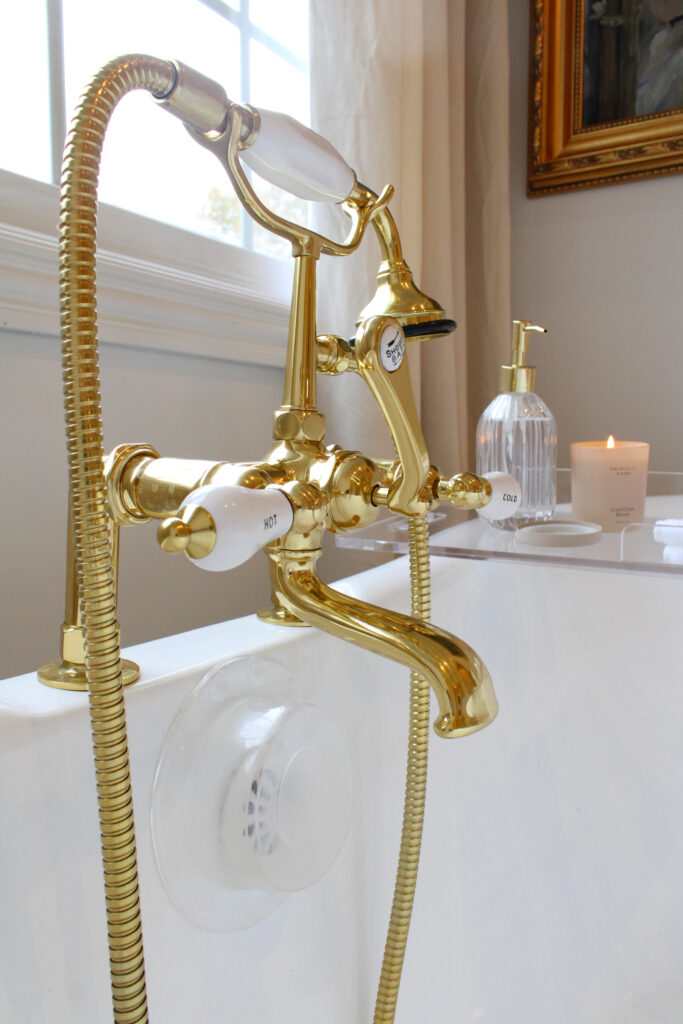
THE TUB IS THE STAR OF THE SHOW!
The tub is my oasis and what I dreamed of during the months when this space was covered in dust. We chose a beautiful freestanding tub and telephone faucet from Signature Hardware, and I added a Frame TV on the side for ultimate relaxation. (Pro tip: Mounting a TV near your tub might sound extravagant, but if you’re a bath person, it’s absolutely worth it.)

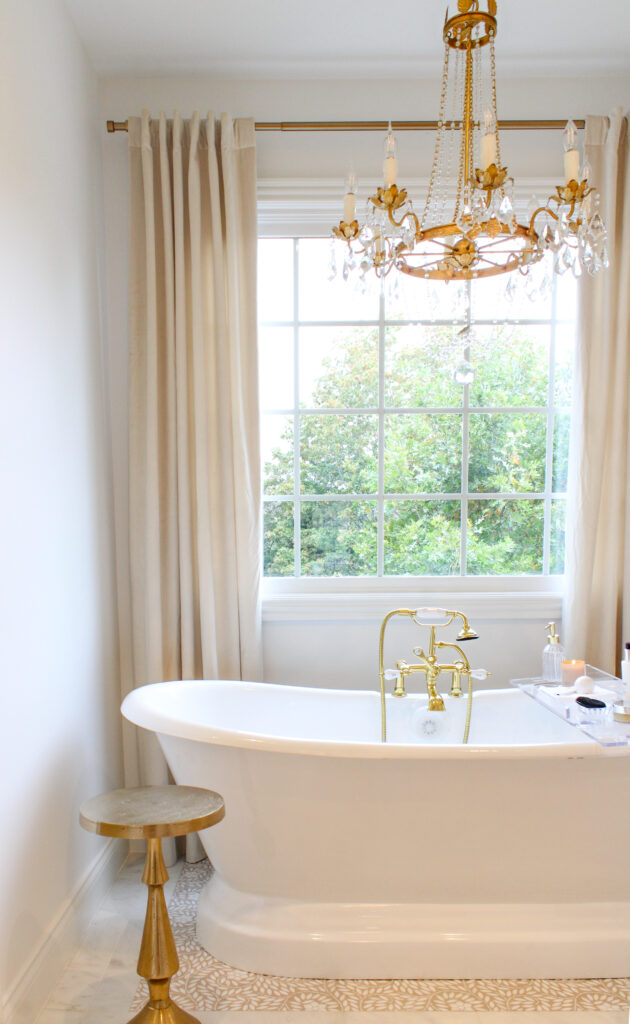
The tile around the tub is one of my favorite design details. It’s a white floral tile from Floor and Decor, paired with a tan grout, to mimic the look of the tile. It’s subtle but makes an impact. If tan grout isn’t your style, grout color is one of the easiest ways to customize your space without adding much cost. Swap out the tan for gray, black, or even white to achieve a much different (but just as beautiful) final look.
For lighting, I installed a chandelier from Wayfair (on a timer!) and added tan curtains with a gold rod from Amazon. These details help make the tub area feel more like a retreat. I’ve made this spot a big part of my nighttime routine – it’s a perfect escape at the end of a long day.
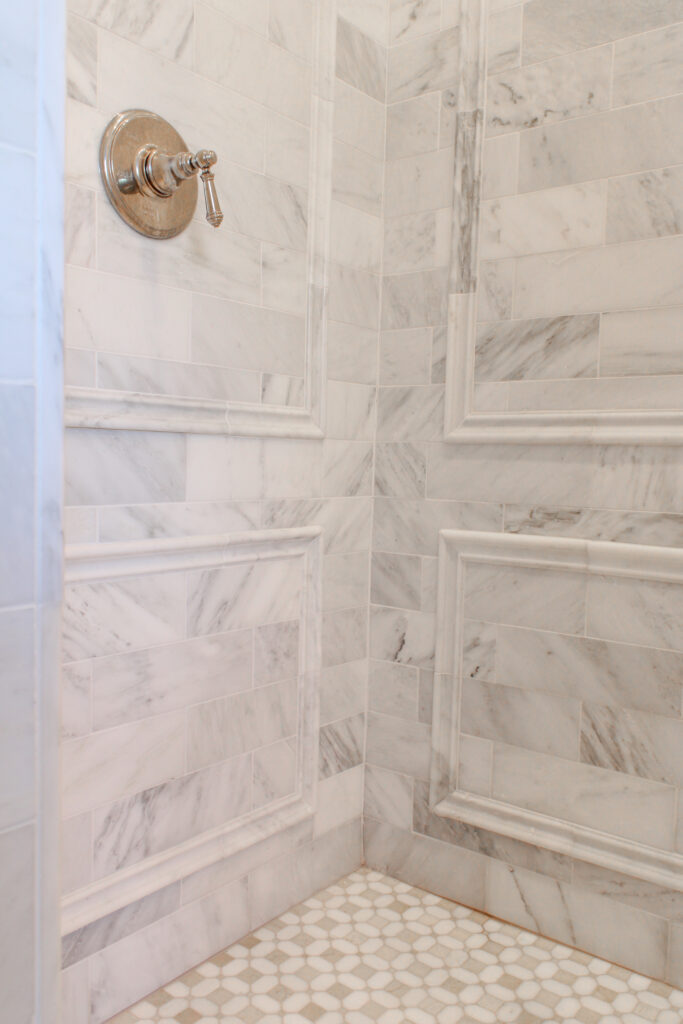
The Shower: Function Meets MIXED METALS
The shower might be the star of this renovation. We worked with a local glass shop to create a custom shower door and I can’t recommend working with local artisans enough for specific projects like this. Not only did they make exactly what we wanted, but we also got to support a local Nashville business.
A few people expressed that they were surprised I went with polished nickel in here rather than carrying the antique brass throughout. What can I say? I love mixing metals!
The shower walls, trim, and thresholds are all Hampton Carrara Marble from The Tile Shop.

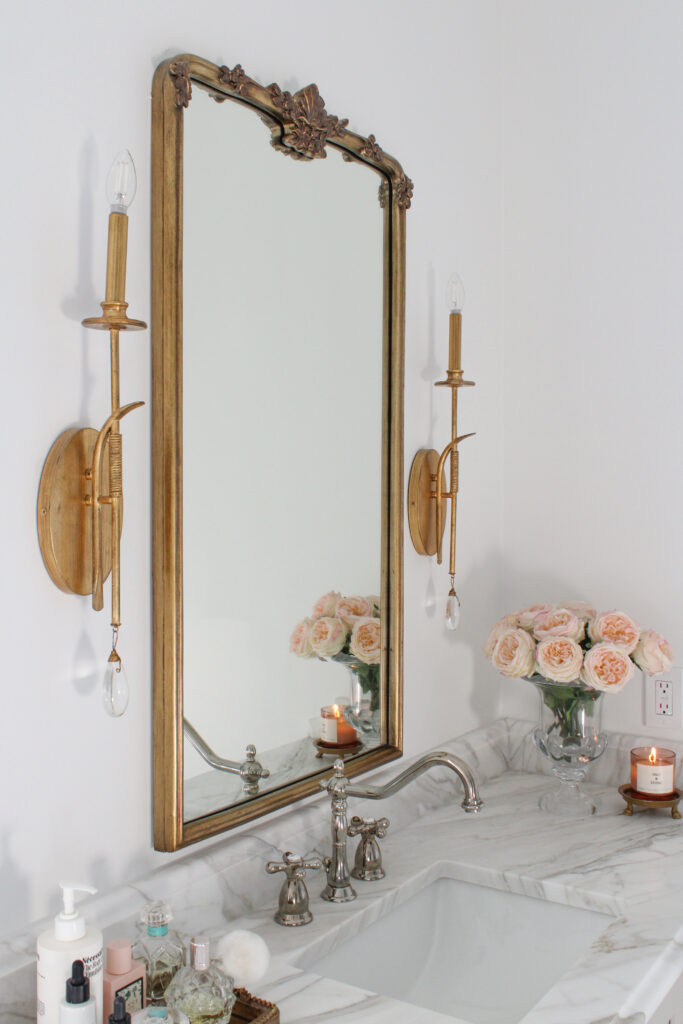
The Art of Mixing Metals
Mixing metals is one of my favorite design tricks, and this bathroom is a perfect example. We used brushed nickel faucets to complement the cool tones of the marble, while gold accents—like the mirrors, hardware, and light fixtures—tie in the warmer tones from the countertops. Mixing metals adds depth and keeps the space from feeling too matchy-matchy.
If you’re curious to learn more tips and tricks to mixing metals in a way that feels really intentional, check out my post: Mixing Metal Finishes: How To Make Different Metals Look Effortless.
Practical Laundry Solutions
One of the more practical additions was turning an overflow storage cabinet into a small laundry area. Having a dedicated laundry space in the bathroom has been a total game-changer. It’s streamlined our chores and made it easier to stay on top of things. While it’s nothing crazy designed, features like this are functional details that I just love to include.
Primary Bathroom Reveal Sources:
Flooring:
- Base flooring for heated coils
- Heated flooring thermostat
- Heating cables – I did a TON of research and these ended up being great!
- Mosaic shower tile flooring
- Non-slip Hampton Carrara marble floor – Southern Stone
Tile:
- Hampton Carrara marble shower tile – from The Tile Shop
- White floral accent tile – Floor and Decor
Vanity:
- Calcutta gold countertops – Southern Stone
- Three cabinet sets put together – RTA cabinets in color Westin Sand Shaker
- Anthropologie vanity mirrors
- Gold knobs + gold backplates
All About The Tub:
- My EXACT tub!
- Telephone-style mounted tub faucet
- Frame TV
- Frame for the Frame TV
- Clear acrylic tub caddy
- Tan curtains
- Gold curtain rod
- Gold side table
- Empire crystal chandelier
Lighting:
Finishes:
- Gold curtain rod
- Gold shampoo and conditioner dispenser
- Gold toilet supply line
- Brushed nickel towel warmer
Accessories:
- My all-time favorite candle to light during a bath!
- Laundry hamper with lid
- Jewelry cleaner
- Clear stackable storage
Primary Bathroom Reveal: My Final Thoughts
This renovation was a labor of love, but I couldn’t be happier with how this primary bathroom reveal turned out! Whether you’re planning a full remodel or just looking for small ways to elevate your bathroom, I hope this post has given you some inspiration and practical tips. If you have any questions or want to know more about a specific detail, please let me know in the comments below!

And to keep up with all the latest on the blog, check out my recent posts:
Leave a Reply